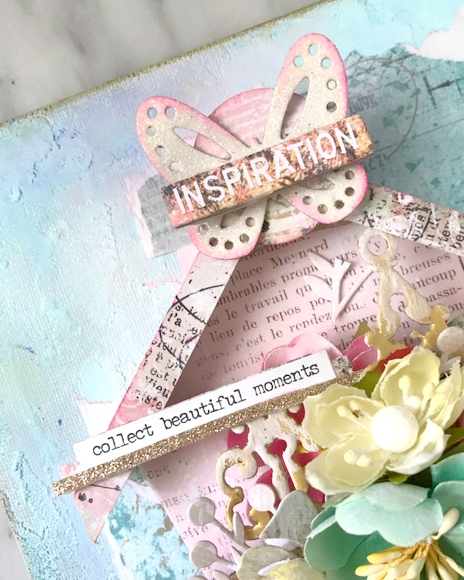
Showing posts with label Jeweled Page Baubles. Show all posts

Saturday, March 23, 2019

Inspiration Panel


Hello all, it's Aida from @aidaville and welcome back to the Blue Fern Studios Blog. Spring is here with soft, sweet blooms and today I have a panel using the fresh colours of the season. To make this interesting, the decorative elements were layered on top of a Bird House shape which can easily be cut out from patterned paper.

Here are the products I used :

Blue Fern Studios supplies :
Printed Chipboard - Wanderlust  |  Happy Accident
Chipboard Jewelled Page Baubles 
Happy Accident #2 - Faux  |  Damsel
Blue Fern Florals
Others : 
7" x 9" Flat Back Canvas Panel
Collage Medium, Acrylic Paints, Water Soluble Crayons, Texture Paste, 
White Gesso, small assorted die-cuts

Start by painting and texturing the canvas. Next, adhere torn pieces of patterned paper with collage medium.

The Jeweled Baubles were given a thick coat of gold paint and after it dried, swipe lightly with white gesso for a shabby look.

I used a Bird House shape to give a framed structure to this piece and make it easy to build on.  It helps to use cut out a thin chipboard shape first and adhere the paper on top of the shape. I didn't used a fixed size, it's mainly "eye-balled" to fit the middle of the canvas.

Glue the Jeweled Baubles to the front of the Bird House, then trim the Scalloped shape printed chipboard into 2 pieces, and glue it on the top.

Bunch up florals of different colours, securely glue them on top of the chipboards and then insert small branches of die cuts to fill any gaps.


On the apex of the roof, I glued on a Butterfly die-cut and layered the chipboard word "Inspiration" from the Happy Accident Printed Chipboard sheet. The sticker "Collect Beautiful Moments" is an ideal addition to the theme of the piece.

I hope the warmer days ahead with young flowers peeping out, the greenery coming back and more time outdoors will give you a boost of inspired ideas. Remember to come back for more gorgeous work from the Blue Fern Studios Team, see you soon !

Aida Haron, @aidaville


Thursday, July 23, 2015

Frolic and more with Sandi ~

"Fun in the Sun"

Hello, Blue Fern Studios fans! 
Sandi here with you today sharing a mix of new products along with some olders ones as well. I hope the month of July is going well for you. Mine is super busy, busy, busy! I hope August will be a little more "normal" and I'll have some leisure time for creating! 

Anyway, I have created a layout for you using the A side of the Friendship paper from the brand new Frolic collection.  I usually try to steer away from the A sides at least for a while but this blue was calling my name .. which is kind of unusual for me.  But I knew that it would be a great background for this photo of the grandkids taken on the Fourth of July weekend, a holiday here in the USA. My photo mat layers are the Adorn papers. 

As par for the course, I did some background work with gesso, a stencil, super heavy gesso and mists. Just a light touch as the papers are so pretty. 


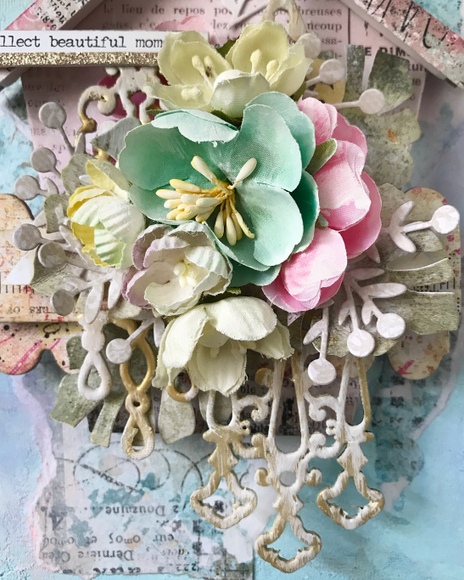
This is the new Frolic Mesh chipboard piece! Gosh, I adore this one! It is for sure going to be a favorite. I inked it and then did sme random embossing in dark copper. 


I was excited to get these sweet Paisley and Vine Flowers chipboard piece in my design team kit! They are adorable ! Sweet and dainty. They were merely gesso-ed and inked. They picked a few random bits of embossing powder from my kraft mat and that created some fun texture


My title piece Fun in the Sun was painted, misted and the embossed all over for a shiny look. 

Blue Fern Studio products used:
Paper:
Frolic Friendship
Frolic Adorn

Chipboard:
Frolic in the Sun
Frolic Mesh
Paisley and Vine Flowers

***

"Cute Stuff"

Next, I decided to play up some of the greens from the Paisley and Vine collection for this photo of my granddaughter. The photo is rather poor quality but she needed it scrapped, so there you go! 
I did some photo editing and tried to have a little fun in the process. 

I've layered a sheet of Whimsy paper over Bohemian and then used torn strips of Bohemain (both sides) along with Splendor. Playing cards made for a perfect photo mat and subtitle. 

Have you seen the new Novelty trim pieces? That red piece in the center is one of them. Mine is painted and then misted in shades of red-orange. I also adore the Deja Vu Atelier Chippie! It made for a beautiful vertical piece to ground my layout. Gesso gave it some tooth and then I used paints and mists. The Cute Stuff title from the Good Vibes set is an oldie that I still enjoy using. I've simply inked it in brown. 

 The Halftone stamp was used to further frame the photo by adding texture and depth all around the photo area. 

Here are a couple of close-ups:


Swooning over the Atelier piece and stamps! 


Just another little close-up. 

Blue Fern Studios products used:
Paper:
Paisley and Vine Splendor
Paisley and Vine Whimsy
Paisley and Vine Bohemian
Paisley and Vine Playing Cards

Chipboard:
Novelty Trims
Déjà Vu Atelier Chippie
Good Vibes

Stamps:
Halftone

***

"Enjoy the Journey"

You might have already seen this one! It was made for last month's Sketch challenge but I never got a chance to share it.  I've used a combination of Ombre Dreams papers, Shannon's Dream and Julianna's Dream. Using a stencil, super heavy gesso and mist, I created a really fun background. A little brighter than I originally had in mind but I love the final result. All my chipboard was treated with gesso, chalk inks and microbeads and are listed below. 

Close-ups:


Love the layering stems.


Microbead fun! 


Blue Fern Studios products used:
Paper:
Ombre Dreams Shannon's Dream paper
Ombre Dreams Julianna's Dream paper

Chipboard:
Layering Stems
Enjoy the Journey title
Jeweled Page Baubles
Flutter Page Singles

Well, that's it from me this month. 
Hopefully next month will be a bit quieter around our house and I can get back to
 creating a little more leisurely. There are lots of new goodies on my desk. 


Thanks for coming by!

Monday, April 14, 2014

3 projects by Evgenia Petzer

Hello dear friends! Its Evgenia Petzer with you today. I have 2 cards to show you today, both of them are made uisng Blue Fern Garden papers and then a hanmade notebook/journal, that has a fabric cover.
So lets start with this one.

 BFS products used: Blue Fern Garden paper, Organic Vine Corner - Large

 I used acorns on this card and added fowersoft inside them...

my second card...

BFS products used: Blue Fern Garden paper, Lace Heart Border, doily bunting

 Absolutely love how you can split this lace heart border for so many pieces and use them separate. I sprinkled mine with silver microbeads.

and a handmade wedding book (for special wishes for a new couple)
I also incorporated the lace that the bride will have on her wedding dress so everything will match perfectly on this special occasion.
 BFS products used: Doily Bunting, Jeweled Page Baubles


 I guess the doily buntng is my most used piece out of all variety that BFS offers- just love it!!!

Have a great day everyone!


Tuesday, March 18, 2014

Different Ideas by Keren Tamir


Hi Blue Fern Studio Fans.

 I have a fun and diverse post for you today. 
This month, I've created three different kinds of projects all very different from each other yet original on their own.
The first one is a layout. I know its just a layout, not so original lol, but continue scrolling down I made two more projects that you might think are more unique.

"Timeless Me"


The picture above is a picture of me when I was a kid. I think I'm probably 4 years old here. I created this layout using the green toned papers from the Blue Fern Garden collection.


I used the inside part of the Helen's Doily. It was a leftover piece from a previous layout. I also used one of the Jeweled Page baubles. Both these pieces were covered in green chalk edger ink and then stamped and edged in brown ink.


 The title Me from the Valentine word set was simply coloured in brown ink,


<<<<<<>>>>>>>

"Love & Thanks Journal"

My second project today is a journal that I created for a friend. I only altered the cover and left the inside blank for her to fill in.


The background was altered using crackle paint, ink and stamping. Once dry, I added a few of the Blue Fern Studio chipboard pieces on top.
I used the Shabby Brick bits, Two of the Veranda Cages, one little bird and the "&" sign from the Valentine Word set.


<<<<<<<<<>>>>>>>>


"Bookmarks"

For my third and final project for March I thought of a great idea on how to use some of the new Blue Fern Studio dangles to create bookmarks. I just thought they were the perfect size to fit inside a book and still have the bottom dangle through the pages.

I believe this would be a perfect gift for a friend's birthday or a teacher's end of the year gift.

I created a step by step  tutorial on how I made these bookmarks:

Step 1: Prime both dangles with Gesso on both sides. Let each side dry before applying it on the other side.


Step 2: Cover the chipboard with crackle paint. I only covered the top side. Let it dry overnight.


Step 3: Cover one of the dangles in brown and yellow chalk ink and the other with green and yellow ink. Do this on both sides. (of course you may choose any colours you like)


Step 4: Seal both sides of the chipboard using Glossy Accents, Diamond glaze or equivalent transparent gel. Let one side dry first before applying it on the other side.


Step 5: Punch a hole through the chipboard at the top of a dangle if it doesn't have one. Then insert a tassel and a fancy brad for decoration.


well I hope you enjoyed my fun and diverse post today!!
Enjoy the rest of March!!!!
Have a wonderful day!!

Keren

Friday, February 7, 2014

Blue Fern Garden with Camilla

I am so excited to show you my first layout and card using the brand new paper collection from Blue Fern Studios. And of course I have used some fabulous Blue Fern Studios chipboards as well.

For my layout I have used one of the papers as background. I have cut out a piece of another to use as layers behind the photos. The paper stripes are actually the pieces I have cut of from the papers I have used. The chipboards you see on the layout are also new. I have only painted them in white.


Here you see one of the Charmed Page Dangles.


And here you see one of the Beaded Strings.


This is the card I made using the papers. 


It is the Jeweled Page Baubles and one of the Eclectic Hearts. I have painted them with white gesso, then smeared on some blue, stamped with black ink and finished with some glossy accents.


Make sure to check back to see some more inspiration from the design team.

Camilla

Monday, January 27, 2014

Some "Blue Fern Garden" Collection Inspiration w/Erin Blegen

Good morning!

Erin Blegen here to share with you my projects for January, including a couple of layouts using the NEW Blue Fern Garden Collection~!!

You will absolutely LOVE these papers :). They are incredibly detailed with crystal clear images printed on a nice heavyweight paper. I was impressed...and I'm confident that you will be too :)

"Magical"
First up, I have a girly girl layout to really show off the truly feminine side of this collection. Lots of pinks with just a hint of blues, paired with a few of my most favorite of the new chipboard designs...

This piece is one of the "Jeweled Page Baubles". I've dressed it up with glitter and various colors of microbeads.

The "Jeweled Trinkets" like this one are just as beautiful :)

I tore a section of the "Number Grid- Small" to create a textured photo mat. I used a sandy colored chalk ink and just a hint of mist/embossing powder to give it a little bit of color.

Blue Fern Studios Products Used:

Blue Fern Garden Collection Papers
Number Grid- Small
Jeweled Trinkets
Jeweled Page Baubles

Next up I have another layout for you using the Blue Fern Garden Collection:

"Live Your Story"
I've taken the opportunity to show the masculine side of this collection with this layout. There are plenty of blues, greens, and browns in these papers which I've put to use here :)

I've added stamping and watercolors to bring the "Beaded Strings" piece to life.

Adding a darker pigment to the outside of the circles while dabbing away the middles helps add some dimension.

Blue Fern Studios Products Used:

Blue Fern Garden Collection Papers
Beaded Strings

Finally, I have a sweet and simple card to share:

"Dream"
I've used one of the sweet little "Petite Windows" pieces to give view to the pretty fairy beyond.

I first dabbed the edges of the window with a pale blue chalk ink and then used Glossy Accents and some white glittery embossing powder to create a frosted look over the rest of the window.

Blue Fern Studios Products Used:

Petite Windows

I'm so glad you stopped in today :)
I hope you've enjoyed this first look at the Blue Fern Garden Collection in action!

And in case you haven't yet, I invite you to join us for our monthly sketch challenge. There are still a few days remaining and we'd LOVE to have you join us :)

Take care!